
Tired of mass-produced decor? You’re not alone. In fact, DIY home improvement projects accounted for around 55% of total home renovation activities in the U.S. in 2023. This trend is set to continue, as over half of the U.S. homeowner population plans to embark on a renovation project this year.
A weekend, a few basic tools, and some imagination are all you need to turn blank walls into personal showpieces. The projects below are sustainable, wallet-savvy, and completely customizable. These ideas let your personality shine without breaking the bank.
1 – Build a Live-Edge Floating Shelf
Project Snapshot
- Difficulty: Beginner/Intermediate
- Time: 3–4 hrs
- Wow Factor: ★★★★☆
Materials & Tools Checklist
- Live-edge hardwood slab
- Hidden floating-shelf brackets
- Orbital sander + 120/220-grit paper
- Food-safe finish (walnut oil or water-based poly)
- Stud finder, drill/driver, level, tape measure
Once your floating shelf is installed, it becomes the perfect display platform for your handcrafted decorations. Style it with engraved pieces created from Michelle’s aDOORable Creations’ wood blanks for crafts to add personalized, artistic touches that showcase your creativity. These custom-decorated cutouts complement the rustic aesthetic of your live-edge shelf while adding character and individuality to your crafty home decor.
Step-by-Step Instructions
- Select & Prep Wood: Trim your slab to the desired length and use a chisel to remove any loose bark carefully. Before sealing, check that the moisture content is below 12% to prevent future warping.
- Sand & Seal: Smooth the surface by progressing from 120-grit to 220-grit sandpaper. Wipe away all dust, then apply two thin coats of your chosen finish, allowing adequate drying time between coats.
- Mark Studs & Install Brackets: Use a stud finder to locate wall studs, typically 16 inches on-center. Mark your bracket locations, predrill pilot holes, and securely attach the brackets with lag screws.
- Mount Shelf: Carefully slide the prepared slab onto the brackets. Use your level to confirm it is perfectly straight from front to back and side to side.
Styling & Customization Ideas
- Keep the natural wood tone for a clean, Scandinavian vibe, or apply an espresso stain for a dramatic, high-contrast look.
- Stack two shelves approximately 10 inches apart to create a striking vertical gallery for photos or small plants.
- Add an LED strip light to the underside of the shelf for a sophisticated, museum-style glow.
Warning/Important: Before sealing, ensure wood moisture is below 12%. Warping often happens *after* installation due to humidity, making this the most critical step for a long-lasting, flat shelf.
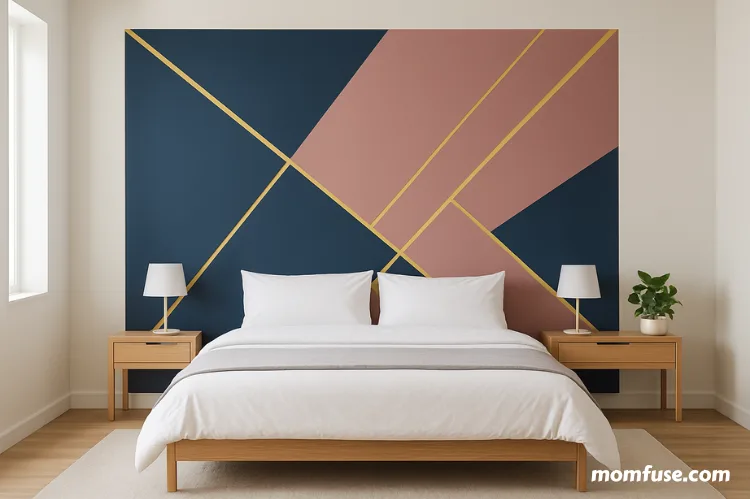
Idea #2 – Create a Painted Geometric Headboard
Project Snapshot
- Difficulty: Beginner
- Time: 2 hrs active / 4 hrs total
- Wow Factor: ★★★★☆
Materials & Tools Checklist
- Painter’s tape (1- and 2-in. widths)
- Low-VOC primer + interior latex paint (2–3 colors)
- Level, pencil, drop cloth, small roller & angled brush
Step-by-Step Instructions
- Plan Your Palette: Use a free online color-wheel tool to find complementary shades. You can even reference a color-psychology chart to set the right mood for your bedroom.
- Prep Wall: Ensure a smooth canvas by filling any small holes and wiping down the wall to remove dust. If you are painting over a dark color, apply a coat of primer first.
- Tape Geometric Shapes: Use a level to establish your baseline first, then build your design upward with tape. Overlap tape strips where lines meet to prevent paint from bleeding underneath.
- Paint, Peel, Perfect: Use a roller for the main areas and a brush for the edges. For razor-sharp lines, carefully remove the painter’s tape while the paint is still slightly tacky.
Style Variations
- Ombre Sunrise: Create a beautiful gradient effect by blending three hues from dark to light across your design.
- Arc Attack: Tie a string to a pencil to use as a giant compass for creating bold, curved shapes.
- Color-Blocking: Match one of the geometric shapes to the color of an accent pillow or throw blanket fabric for a cohesive look.
Pro Tip: For perfectly crisp, razor-sharp lines, carefully remove the painter’s tape while the paint is still slightly tacky. Waiting until it’s fully dry can cause the paint film to peel off with the tape.
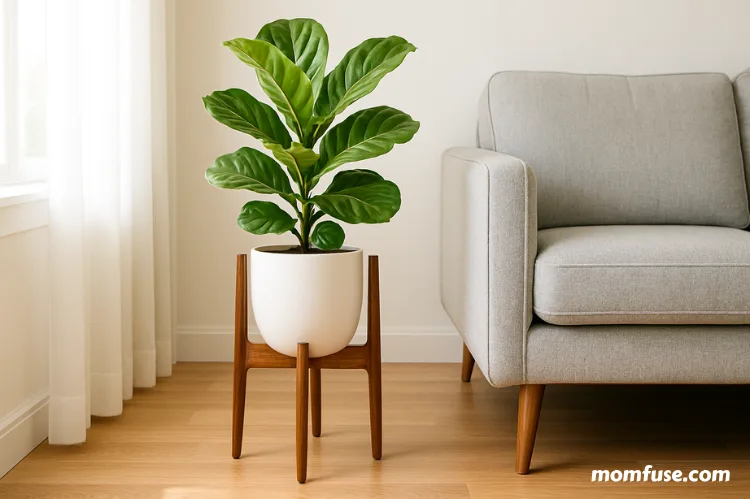
Idea #3 – Craft a DIY Wood Plant Stand
Project Snapshot
- Difficulty: Beginner
- Time: 90 min
- Wow Factor: ★★★☆☆
Materials & Tools Checklist
- 1 × 2 or 2 × 2 lumber (6 ft)
- Pocket-hole jig + 1¼-in. screws
- Miter saw or handsaw, drill/driver
- Sandpaper, stain/paint, poly sealer
Step-by-Step Instructions
- Measure Pot & Cut Stock: Determine the leg height by adding 3 inches to your pot’s height. The crosspieces should be the pot’s diameter plus a half-inch for clearance. Cut your lumber to these dimensions.
- Assemble X-Frame: Use a pocket-hole jig to drill 15° pocket holes into your pieces. Join two legs to form an “X” shape and repeat. Then, attach the crosspieces to connect the two X-frames.
- Finish: Sand the entire stand smooth, up to 220-grit sandpaper. Apply a mid-century walnut stain or a chalk-white paint for a farmhouse chic look, then finish with a top coat of water-based polyurethane.
Styling & Customization
- Tiered Stands: Build two stands of different sizes and stack them to create a multi-level jungle vibe in any corner.
- Rustic Hairpin: Replace the lower crosspiece with a ¼-inch metal rod for a cool, industrial edge.
- Mobile Greenery: Add small brass casters to the bottom of the legs for a stand you can easily roll from inside to the patio.
Key Insight: The choice of wood is more than aesthetic. Using unfinished, straight-grained lumber not only provides a cleaner look but also significantly reduces project waste and frustration compared to warped construction-grade boards.
Your Next Steps
You now have three trend-forward, budget-friendly projects you can complete in a single weekend. Mix and match finishes, experiment with shapes, and remember that “mistakes” often become the best design features.
The goal is to create a space that reflects your unique personality and story. Happy crafting, and here’s to a home that’s uniquely and beautifully yours!
Quote: Don’t fear imperfections. In DIY projects, unexpected ‘mistakes’ often evolve into your favorite, most unique design features, telling a story that mass-produced items never can.
Read Next: Chic Yet Childproof: Tips for Balancing Design and Function
Jessica Fuqua is a mom of two who writes about the messy, beautiful reality of raising kids. She believes parenting advice should feel like a conversation with a friend, not a lecture. When she’s not writing, she’s probably reheating the same cup of coffee for the third time.